Develop code#
您可以通过修复错误或开发新功能来帮助改进 PyMAPDL。要做到这两点,您必须按照以下章节的说明,在本地机器上设置版本库。
Clone the PyMAPDL repository#
在克隆 PyMAPDL 代码库之前,您必须安装一个版本控制系统,比如 Git。您可以运行这段代码来克隆 PyMAPDL 的最新开发版本:
git clone https://github.com/ansys/pymapdl
cd pymapdl
Create a Python virtual environment#
为了避免依赖冲突和更方便地管理升级,您应该将 PyMAPDL 安装在自己的虚拟环境中。有关如何安装 Python 和创建虚拟环境的详细信息,请参阅 设置开发环境 。
Install PyMAPDL in development mode#
使用这些命令在开发模式下安装 PyMAPDL 的最新版本:
cd pymapdl
pip install pip -U
pip install -e .
如果要进行测试,必须使用此命令安装测试依赖项:
pip install -e '.[tests]'
Developing using Codespaces#
使用 GitHub Codespaces 可以节省时间,它可以启动一个基于 Visual Studio Code 的完全就绪的编码环境。在这个环境中,为了方便起见,前面的一些步骤已经设置好了:
已安装 MAPDL 学生版。
Git 已安装,并克隆了最新的 PyMAPDL 分支。
安装了 Python 环境和所有依赖项。
PyMAPDL 安装为可编辑。
有关更多信息,请参阅 Develop on Codespaces。
Develop PyMAPDL#
Now it is time to develop PyMAPDL!
在版本库中开发代码,尤其是使用 Git 等版本控制系统时,需要一套基本准则来确保高效协作、代码管理和跟踪变更。以下是在版本库中开发代码的主要指导原则:
使用分支:为不同的功能、错误修复或实验创建分支。这样可以将变更隔离,便于并行开发。
撰写描述性的提交信息:提供简洁明了的提交信息,解释更改的目的和背景。遵循一致的风格。
频繁提交:经常进行有意义的小规模提交。避免在一次提交中进行大量无关的修改。
先拉后推:在推送自己的更改之前,始终使用远程存储库中的最新更改更新本地分支,以避免冲突。
使用拉取请求(PR):使用 “拉取请求” 提交更改以供审核。这样可以在合并到主分支之前进行讨论和验证。
撰写良好的文档:为您的贡献或更改维护清晰的最新文档,包括代码中的注释以及 rST 或 Markdown 文件中的相关项目文档。 如果您实现了新功能或以任何方式改变了库的行为,请记得在文档中提及(rST 文件位于
docsource目录中)。 遵循 numpydoc 惯例来记录代码。测试更改:彻底测试您的更改,以确保它们按预期运行。如果适用,创建或更新在持续集成/持续部署 (CI/CD) 管道上运行的单元测试,以便及早发现问题并确保可靠的部署。有关详细信息,请参阅 Unit testing 。
尊重代码风格和标准:遵循代码风格指南,遵守语言或框架的特定编码标准。
合作与沟通:与团队成员沟通,提供最新进展情况,及时解决任何冲突。
寻求帮助:为了确保代码质量、发现问题并分享知识,请 PyMAPDL 开发人员协助您并审查您的代码。如果您需要帮助或指导,请在评论中提及
@ansys/pymapdl-maintainers以通知他们。
通过遵循这些准则,您可以确保在资源库中顺利、有序地进行代码开发,促进协作、提高代码质量和功能增强。
Unit testing#
单元测试通过测试某个方法、类或模块内部实现的逻辑是否按预期运行来验证软件。单元测试应尽可能自动和独立。
单元测试非常重要。测试验证代码的更改是否与代码的其他部分保持一致,并验证这些更改是否正确实施。
在 PyMAPDL 代码库中, pytest 用于运行测试,单元测试和集成测试都在该代码库中的 tests 目录下。单元测试与集成测试的区别在于,后者测试多个单元的代码,以确保它们都能协同工作。
要运行所有单元测试,请使用以下命令:
(.venv) mapdl@machine:~/pymapdl$ pytest
如果在 Linux 机器上运行 ,则必须安装 xvfb 操作系统库,并以 xvfb-run 命令为前缀运行前面的命令。
(.venv) mapdl@machine:~/pymapdl$ xvfb-run pytest
如果只想运行特定的测试子集,可以使用 -k 参数使用布尔值过滤测试:
(.venv) mapdl@machine:~/pymapdl$ pytest -k "test_nlist_to_array or test_string_with_literal"
==================================================== test session starts ====================================================
platform darwin -- Python 3.10.13, pytest-7.4.3, pluggy-1.3.0
rootdir: /Users/german.ayuso/pymapdl
configfile: pyproject.toml
testpaths: tests
plugins: timeout-2.2.0, cov-4.1.0, sphinx-0.5.0, rerunfailures-13.0, anyio-4.1.0, pytest_pyvista-0.1.9
collected 1468 items / 1466 deselected / 4 skipped / 2 selected

tests/test_commands.py ..                                                                                             [100%]

=============================================== PyMAPDL Pytest short summary ================================================
======================================= 2 passed, 4 skipped, 1466 deselected in 2.27s =======================================
Creation of a unit test#
pytest 文件的名称必须是 test_XXX.py 格式,其中 XXX 可以是要测试的函数、方法或类,也可以是其他说明性名称。在命令行中,可以使用 -k 参数过滤要运行的测试。更多信息,请参阅 pytest usage 。
下面是一些创建良好单元测试的指导原则:
为测试指定长而具有描述性的名称。
使用 Codecov 工具确保所有执行的代码都经过测试。
检查每次测试的结果是否相同。
验证测试的独立性。
编写测试,每次只验证代码的一部分。
尽可能缩短测试时间,加快测试速度。
怎样才能做好单元测试? 详尽列举了创建优秀单元测试的技巧。
大多数 PyMAPDL 测试都需要连接到一个正在运行的 MAPDL 实例,这使得它们成为集成测试。如果你的测试需要一个运行中的 MAPDL 实例,你可以在函数签名中使用 PyMAPDL mapdl 方法。它会在每个测试的上游执行,而不是在所有测试中执行。
def test_my_new_feature(mapdl):  # pass the 'mapdl' fixture as an argument.
    mapdl.prep7()
    # .... more code

    return True  # if everything goes ok until here
如果本地没有安装 MAPDL,但仍想运行单元测试,则必须设置以下环境变量。
在 Windows 中,请使用此代码:
SET PYMAPDL_START_INSTANCE=False
SET PYMAPDL_PORT=<MAPDL Port> (default 50052)
SET PYMAPDL_IP=<MAPDL IP> (default 127.0.0.1)
在 Linux 中,请使用此代码:
export PYMAPDL_START_INSTANCE=False
export PYMAPDL_PORT=<MAPDL Port> (default 50052)
export PYMAPDL_IP=<MAPDL IP> (default 127.0.0.1)
当使用 launch_mapdl 函数时,这些环境变量会告诉 PyMAPDL 默认尝试连接到现有的 MAPDL 服务。
此外,您还可以使用 PYMAPDL_MAPDL_EXEC 和 PYMAPDL_MAPDL_VERSION 环境变量来指定 MAPDL 的可执行路径和要启动的版本(如果安装了多个版本的 MAPDL)。
Continuous integration and continuous deployment#
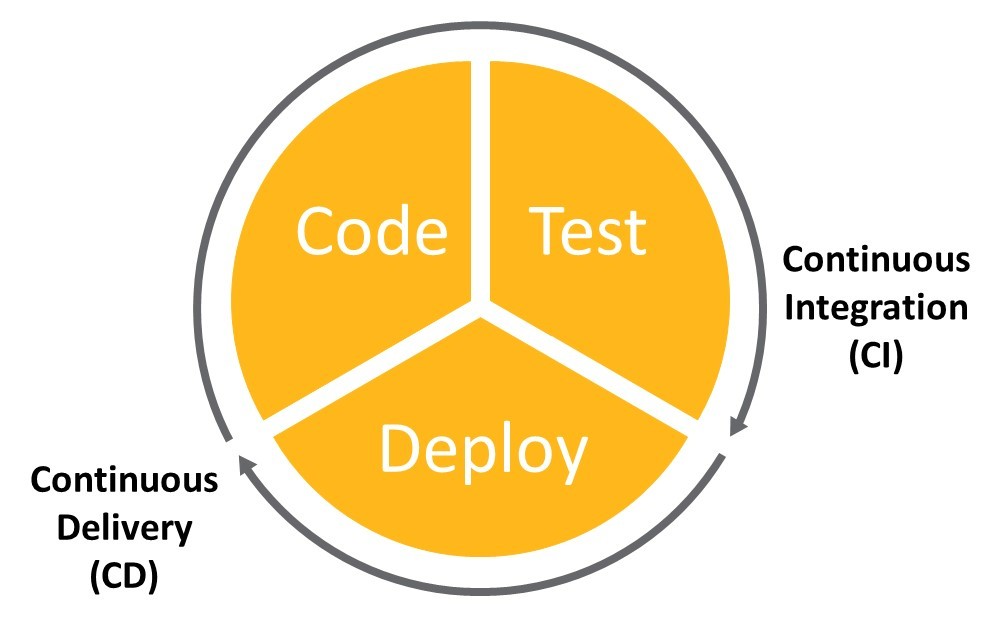
单元测试和集成测试是持续集成(CI)的一部分。通过自动化测试、监控和部署新添加的代码,可以在整个应用程序生命周期内实现持续部署(CD),提供全面的 CI/CD 方法。

Example#
test_component.py 文件包含 ComponentManager 类的单元测试和集成测试。这些测试只是 测试目录 中众多测试的一部分。
下面是一些使用 pytest 的示例:
import pytest


# 'cube_geom_and_mesh' is another fixture defined in 'conftest.py'
@pytest.fixture(scope="function")
def basic_components(mapdl, cube_geom_and_mesh):
    """Given a model in 'cube_geom_and_mesh', define some components to work with later."""
    mapdl.components["mycomp1"] = "NODE", [1, 2, 3]
    mapdl.components["mycomp2"] = "KP", [1, 3]

    mapdl.cmsel("s", "mycomp1")
    mapdl.cmsel("a", "mycomp2")


def test_dunder_methods_keys(mapdl, basic_components):
    assert ["MYCOMP1", "MYCOMP2"] == list(mapdl.components.names())


def test_dunder_methods_types(mapdl, basic_components):
    assert ["NODE", "KP"] == list(mapdl.components.types())


def test_dunder_methods_items(mapdl, basic_components):
    assert [("MYCOMP1", "NODE"), ("MYCOMP2", "KP")] == list(mapdl.components.items())
有关进一步的 pytest 配置详情,请参阅 pytest 文档 。
Code coverage#
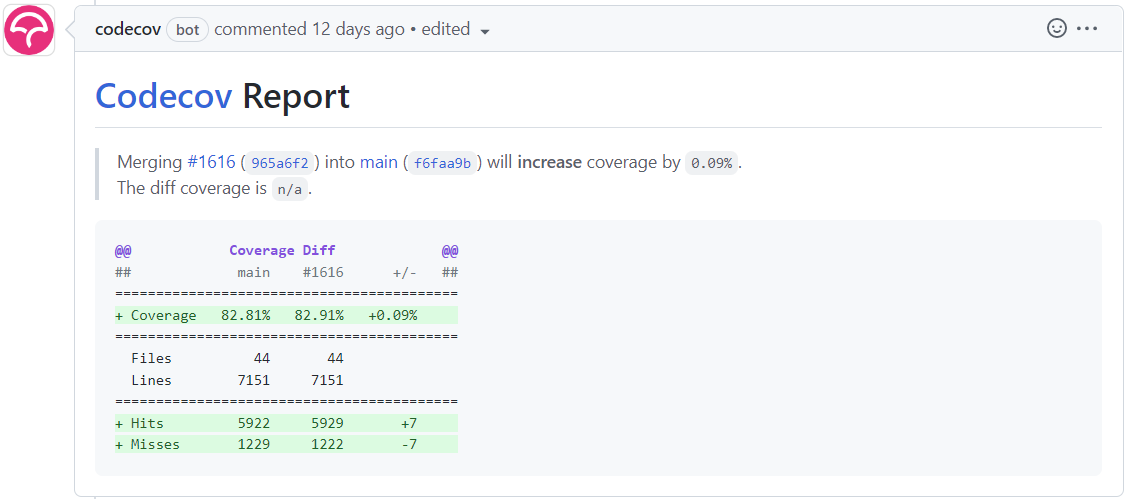
为了验证所有代码都经过了正确的测试,您必须确保每一段代码都至少在一个单元测试中使用(覆盖)过。在该版本库中, Codecov 工具会生成已提交代码的覆盖率报告。报告会指出合并拉取请求会对覆盖率产生怎样的影响。该报告的生成是合并代码变更时必须成功运行的检查之一。

Coverage example#
为了说明覆盖范围是如何工作的,假设您拥有这个库:
Awesome library
def get_report_colors(theme):
    if theme == "weather":
        colors = ["blue", "lightblue", "grey"]
    elif theme == "traffic":
        colors = ["red", "orange", "yellow"]
    else:
        colors = ["red", "blue", "green"]

    return colors
Tests
您可以选择以这种配置运行测试:
def test_get_report_colors():
    assert get_report_colors("weather") == ["blue", "lightblue", "grey"]
    assert get_report_colors("traffic") == ["red", "orange", "yellow"]
    assert get_report_colors("other") == ["red", "blue", "green"]
或者,如果某个方法比较复杂,也可以将案例分成不同的测试:
def test_get_report_colors_weather():
    assert get_report_colors("weather") == ["blue", "lightblue", "grey"]


def test_get_report_colors_traffic():
    assert get_report_colors("traffic") == ["red", "orange", "yellow"]


def test_get_report_colors_other():
    assert get_report_colors("other") == ["red", "blue", "green"]
虽然两种情况下的代码覆盖率对函数来说都是 100%,但第二种情况对调试函数更有用。
还可以使用 parametrize (pytest.mark.parametrize) 使代码更易读,也更容易重构。
@pytest.mark.parametrize(
    "theme,output",
    [
        ["weather", "traffic", "other"],
        [
            ["blue", "lightblue", "grey"]["red", "orange", "yellow"][
                "red", "blue", "green"
            ]
        ],
    ],
)
def test_get_report_color(theme, output):
    assert get_report_colors(theme) == output
有关进一步解释,请参阅 pytest 文档 。
Code style#
PyMAPDL 遵循 PyAnsys 开发指南 中所列出的 PEP8 标准,并使用 pre-commit 实现样式检查。
要确保您的代码符合最低代码样式标准,请运行这些命令:
(.venv) mapdl@machine:~/pymapdl$ pip install pre-commit
(.venv) mapdl@machine:~/pymapdl$ pre-commit run --all-files
You can also install this as a pre-commit hook by running this command:
(.venv) mapdl@machine:~/pymapdl$ pre-commit install
Since you have installed pre-commit as a hook, git automatically
runs these hooks before committing, failing if it find any
format issues and making or proposing the necessary changes
to the commit.
If this happens, you might need to run commit and edit these
changes several times before commit successfully.
(.venv) mapdl@machine:~/pymapdl$ git commit -m "my commit"
[INFO] Stashing unstaged files to /home/mapdl/.cache/pre-commit/patch1704703895-16914.
Add License Headers......................................................Passed
isort....................................................................Passed
numpydoc-validation......................................................Passed
black....................................................................Passed
blacken-docs.............................................................Failed
- hook id: blacken-docs
- exit code: 1
- files were modified by this hook

doc/source/getting_started/develop_pymapdl.rst: Rewriting...
这样,您就不可能推送未通过样式检查的代码。例如
(.venv) mapdl@machine:~/pymapdl$ git commit -m "my commit"
[WARNING] Unstaged files detected.
[INFO] Stashing unstaged files to /home/mapdl/.cache/pre-commit/patch1704703895-16914.
Add License Headers..................................(no files to check)Skipped
isort................................................(no files to check)Skipped
numpydoc-validation..................................(no files to check)Skipped
black................................................(no files to check)Skipped
blacken-docs.............................................................Passed
flake8...............................................(no files to check)Skipped
codespell................................................................Passed
check for merge conflicts................................................Passed
debug statements (python)............................(no files to check)Skipped
Validate GitHub Workflows............................(no files to check)Skipped
[INFO] Restored changes from /home/mapdl/.cache/pre-commit/patch1704703895-16914.
[ci/codespaces-quick-fixes-regarding-welcome-page c0f59f4c] my commit
1 file changed, 25 insertions(+)
(.venv) mapdl@machine:~/pymapdl$
First time you run pre-commit (using git commit or pre-commit), the command
might take a bit of time (2-3 minutes) to download the specified hooks and install them.
After that first time, analysing your commits should take seconds.
pre-commit hooks can also be updated, added or removed. For more information, visit
pre-commit website.